Unlocking Creativity with TREE Wall Panels SET and Decor Templates
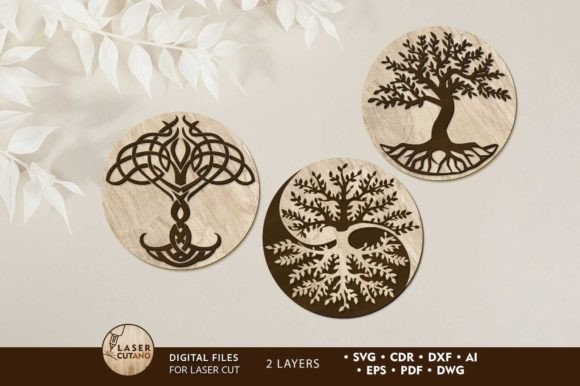
The allure of the TREE Wall Panels SET, Decor Templates lies in its ability to transform a blank wall into a statement of natural beauty and artistic sophistication. For creators, small business owners, and hobbyists alike, these digital multilayer layout files offer a gateway to producing captivating wood art panels that exude deep symbolism. Whether you are using a laser cutter, CNC router, or other cutting machines, the potential to craft a stunning "Tree of Life" piece is right at your fingertips. However, moving from a digital download to a flawless finished product requires more than just hitting "print." Many enthusiasts rush into production only to encounter avoidable pitfalls that compromise the quality of their work. By understanding the nuances of these files and preparing correctly, you can ensure your final creation is as exquisite as the design intends.
Understanding the Digital Foundation
At its core, this product is a comprehensive collection of vector files designed for precision manufacturing. Upon payment, you gain access to a .zip archive containing formats like .AI, .SVG, .DXF, .DWG, .CDR, .EPS, and .PDF. This variety ensures compatibility with virtually any software or machine setup you might own. Yet, a common misunderstanding occurs immediately after purchase: users often attempt to open individual files without first extracting the entire archive. Always unzip the folder before using the files. Trying to access vectors directly from a compressed zip file can lead to corrupted data, missing layers, or software crashes, wasting valuable time before you even begin designing.
Another frequent oversight involves file format selection. While having ten different formats sounds generous, beginners often choose the wrong one for their specific workflow. For instance, if you are using a CNC router, a .DXF or .DWG file is typically superior for maintaining precise dimensions and toolpaths. Conversely, laser cutters often pair best with .SVG or .AI files for clean edge definition. Selecting a raster-based PDF when a vector file is available can result in jagged edges and poor cutting performance. Take a moment to match the file type to your machine's strengths; this simple check significantly impacts the crispness of your final cut.
Material Selection and Thickness Pitfalls
The TREE Wall Panels SET is optimized for specific material constraints, yet one of the most costly mistakes makers make is ignoring the recommended thickness. The design specifies a material thickness of 3–6 mm (approximately 1/8 to 1/4 inch) for wood products like plywood or MDF. Deviating from this range without adjusting the file can be disastrous. If you use material that is too thick, the interlocking joints or glue channels may not align, preventing the layers from sitting flush. If the material is too thin, the structural integrity of the delicate branches and leaves—especially in a multilayer model—can fail, leading to breakage during assembly or installation.
Furthermore, the choice of material affects the aesthetic outcome. While the templates support plywood, MDF, acrylic, plexiglas, and even cardboard, each behaves differently under the laser or router bit. Plywood offers a warm, organic look but may have voids in inner layers that ruin fine details. MDF provides a smooth, uniform surface ideal for painting but produces more dust and requires proper ventilation. Acrylic yields a modern, translucent effect but demands precise power settings to avoid melting edges. Before committing to a full sheet, run test cuts on scrap pieces of your chosen material. This practice saves money and prevents the heartbreak of ruining an expensive sheet of premium hardwood or colored acrylic.
Scaling and Structural Integrity
Flexibility is a key selling point of these decor templates; you are free to increase the size of the design to fit large feature walls. However, reducing the size requires extreme caution. The "Tree of Life" design features intricate, thin elements representing twigs and leaves. When you scale the design down, these elements become proportionally thinner. If reduced too much, they may become fragile to the point of snapping during handling or failing to survive the cutting process entirely. A good rule of thumb is to never scale below 80% of the original dimensions unless you are switching to a material with higher tensile strength, such as metal or high-grade acrylic.
Conversely, when scaling up, consider the limitations of your machine bed size. The finished product at standard scale is 14.5 x 14.5 inches. Enlarging this significantly may require splitting the design across multiple sheets, introducing seam lines that can disrupt the visual flow of the tree. Planning your layout to minimize visible seams or strategically hiding them within the trunk or dense foliage areas is a pro tip that elevates the professional look of the final piece.
The Assembly and Finishing Process
Perhaps the most critical advice for achieving a museum-quality finish relates to the order of operations during assembly. This is a multilayer layout where each layer is glued together. A widespread error among beginners is assembling the layers first and then attempting to paint or stain the piece. This approach leads to uneven coverage, drips in the crevices between layers, and an overall amateurish appearance. Paint before gluing. By finishing each individual layer separately, you ensure that every nook and cranny receives equal attention. Once dry, the layers can be bonded cleanly, resulting in sharp contrasts and a polished depth that highlights the 3D nature of the artwork.
Additionally, do not overlook the engraving aspect of the design. The files include vector paths specifically meant for engraving textures or details onto the surface. Ignoring these lines removes a layer of sophistication, while mishandling them (by setting the laser power too high) can burn through the material. Test your engraving settings on a scrap piece of the same material to find the sweet spot where the texture is visible but the material remains intact.
Making the Right Choice for Your Project
Before downloading and starting your project, evaluate your current skill level and equipment. Are you comfortable working with multilayer assemblies? Do you have clamps suitable for holding thin layers together while the adhesive cures? If you are new to layered wood art, start with the standard 14.5-inch size using 3mm plywood. It offers a forgiving balance of detail and durability. As you gain confidence, experiment with larger scales or alternative materials like acrylic for a contemporary twist.
Ultimately, the TREE Wall Panels SET, Decor Templates provides a robust foundation for creating meaningful art. The difference between a good result and a great one often lies in the preparation. By respecting the file formats, adhering to material thickness guidelines, scaling wisely, and prioritizing the "paint before glue" workflow, you position yourself for success. These digital files are not just instructions; they are a partner in your creative process. Treat them with the care they deserve, and the resulting Tree of Life panel will serve as a testament to your craftsmanship, adorning your living space with striking aesthetics and enduring symbolism for years to come.