Mastering Your Garden Design with the Honeycomb Trellis Plant Climbing Laser File
There is a distinct satisfaction in watching a digital design transform into a physical object that serves both function and beauty in your garden. For creators, small business owners, and hobbyists alike, the Honeycomb Trellis Plant Climbing Laser file offers a fantastic opportunity to craft custom supports for climbing plants. However, jumping straight from downloading a file to cutting wood can lead to frustrating results if you overlook critical details. This guide isn't just about selling you a file; it is about ensuring your project succeeds the first time by addressing common pitfalls and offering practical, experienced advice.
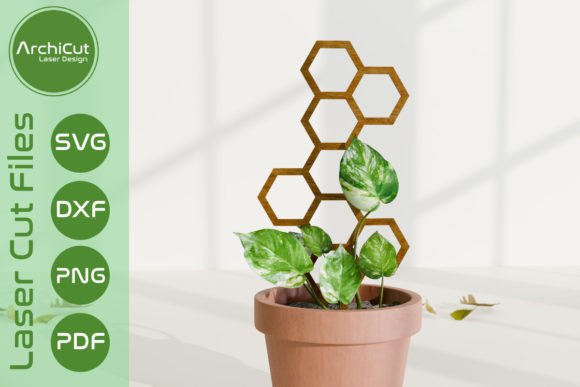
The Honeycomb Trellis for plant climbing Laser Cut layout file is designed specifically for laser cutting machines and CNC routers. When you purchase this product, you receive a comprehensive .zip folder containing SVG, DXF, PNG, and PDF formats. While having multiple formats is excellent for compatibility, simply unzipping the folder and hitting "start" on your machine is rarely the best approach. Many users underestimate the importance of material selection and machine calibration, leading to wasted resources and subpar trellises that may not support plant growth effectively.
Understanding the Material Constraints
One of the most frequent mistakes makers encounter involves material thickness. The recommended material for this specific honeycomb design is 3 mm plywood. It might be tempting to use whatever scrap wood you have lying around, perhaps something slightly thicker or thinner, but this can compromise the structural integrity of the trellis. If the material is too thin, the interlocking joints—essential for the multilayer panel design—will be loose, causing the structure to wobble or collapse under the weight of growing vines. Conversely, if the material is too thick, the pieces simply won't fit together without forcing them, which can split the wood or distort the geometric honeycomb pattern.
Furthermore, not all plywood is created equal. Using low-grade plywood with large voids or inconsistent layering can result in burn marks that are difficult to sand out, ruining the aesthetic appeal of your final product. For a professional finish, especially if you plan to sell these trellises or display them prominently, invest in high-quality birch or Baltic birch plywood. These materials cut cleanly and provide the durability needed for outdoor or indoor plant support.
Navigating File Formats and Software Compatibility
Another area where beginners often stumble is file format selection. The download includes SVG, DXF, PNG, and PDF files, but choosing the wrong one for your workflow can lead to scaling issues or lost vector data. For laser cutters and CNC routers, you generally want to work with vector files like SVG or DXF. These formats preserve the precise lines and curves necessary for the machine to follow. Using a PNG, which is a raster image, can cause your machine to interpret the design as a series of dots rather than continuous paths, resulting in jagged edges and inefficient cutting times.
Before sending any file to your machine, always open it in your preferred design software to verify the scale. The decorative multilayer panel layout size is roughly 16 x 33 cm. If your software defaults to inches or interprets the units differently, your trellis could end up significantly larger or smaller than intended. A trellis that is too small may fail to support vigorous climbers like peas or beans, while one that is too large might look disproportionate in a small container garden. Take the extra five minutes to measure the dimensions on your screen against the stated specifications.
Assembly and Structural Considerations
The beauty of the honeycomb design lies in its multilayer construction, which creates depth and stability. However, assembling these layers requires patience and precision. A common oversight is neglecting to account for the kerf—the width of the material removed by the laser beam during cutting. If your machine's kerf compensation is not set correctly, the slots may be too tight or too loose. Test cuts on scrap pieces of the same 3 mm plywood are essential. This simple step saves you from ruining an entire sheet of material and ensures that the layers slide together smoothly without needing excessive glue or force.
When assembling, consider the orientation of the trellis. Will it stand freely in a pot, or will it be mounted against a wall? The honeycomb structure is strong, but like any lattice, it benefits from proper anchoring. If you are using this for heavy climbers, ensure the base is weighted or secured. Some users mistakenly assume the interlocking joints alone provide enough stability for tall plants, only to find their creation tipping over in a breeze or under the weight of fruit. Reinforcing the base or adding a simple stake can make a significant difference in longevity.
Maximizing Efficiency and Aesthetics
For entrepreneurs and freelancers looking to produce these trellises in batches, efficiency is key. Arranging your cut files to minimize waste on the plywood sheet is a skill that pays off. The 16 x 33 cm size allows for nesting multiple units on a standard sheet, but poor arrangement can lead to excessive offcuts. Plan your cuts strategically. Additionally, think about the finish. Raw plywood is functional, but a quick sealant or non-toxic paint can protect the wood from moisture and extend its life outdoors. Applying finish before assembly can sometimes be easier than trying to reach into the nooks and crannies of the assembled honeycomb.
Remember that the goal is to create a supportive environment for your plants while enhancing your space visually. The hexagonal pattern mimics nature, making it an ideal choice for gardens. By paying attention to material quality, file settings, and assembly techniques, you elevate your project from a simple craft experiment to a polished, professional-grade item. Whether you are a beginner learning the ropes of laser cutting or a seasoned pro expanding your product line, taking these corrective steps ensures satisfaction and reduces waste.
Key Checklist Before You Cut
- Verify Material: Ensure you have high-quality 3 mm plywood ready.
- Check Dimensions: Confirm the design measures 16 x 33 cm in your software.
- Select Vector Files: Use SVG or DXF for clean cutting paths.
- Test Kerf: Run a test cut on scrap wood to adjust for beam width.
- Plan Assembly: Decide on mounting methods and finishing products beforehand.
By approaching the Honeycomb Trellis Plant Climbing Laser project with preparation and attention to detail, you avoid the common frustrations that plague many DIY endeavors. The result is a durable, attractive trellis that supports your garden's growth and showcases your craftsmanship. Happy making!